Introduction:
Custom skyboxes play a crucial role in creating immersive virtual reality (VR) experiences. For Quest users, the ability to personalize their VR environment adds a unique touch to their gaming adventures. In this comprehensive guide, we will walk you through the process of making a custom skybox specifically for the Quest, allowing you to create breathtaking worlds and enhance the overall visual appeal of your virtual reality environment.

1. Understanding Skyboxes:
Before diving into the creation process, it’s essential to understand what skyboxes are. In VR, skyboxes are 360-degree images or textures that surround the virtual world, creating the illusion of a vast and realistic environment. By replacing the default skybox, you can transport yourself to various landscapes, futuristic cities, or even outer space, based on your creative vision.
2. Tools and Software:
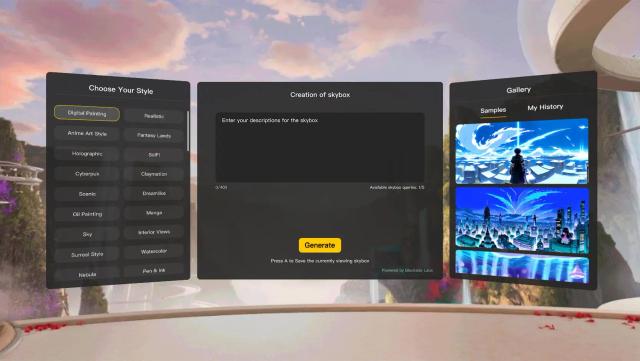
To create a custom skybox for Quest, you will need specific tools and software. Some popular choices include Unity, Blender, and Photoshop. Unity provides an intuitive platform for building VR experiences, while Blender and Photoshop are excellent for creating and editing 3D models and textures. Meanwhile, AI-generation itool is strongly recommended to general VR users to quickly create your ideal skyboxes. For example, Moon VR Home’s AI-generated skybox feature allows you to make your unique skyboxes by just describing it.
3. Designing Your Skybox:
- Conceptualization: Start by brainstorming ideas and envisioning the environment you want to create. Consider factors such as the theme, mood, and color palette to evoke specific emotions within your virtual world.
- Creating 3D Models: If you want to incorporate 3D objects into your skybox, use software like Blender to model and texture them. Ensure that the models are optimized for performance in a real-time VR environment.
- Texture Creation: Use software like Photoshop to design high-resolution textures for your skybox. Pay attention to details such as lighting, shadows, and seamless integration to create a visually stunning skybox.
- Panorama Creation: To generate a 360-degree image for your skybox, you can either capture real-world environments using a panoramic camera or create one digitally using specialized software. Maintain high image quality and resolution to ensure an immersive experience.
4. Importing Skybox into Unity:
- Setting up Unity: Install the latest version of Unity and create a new project. Ensure that you have the Oculus Integration package installed to optimize compatibility with the Quest.
- Importing Assets: Import your 3D models, textures, and the skybox image into Unity. Organize them properly in the project hierarchy for easy access and management.
- Applying the Skybox: Create a new material in Unity and assign the skybox texture to it. Apply this material to the appropriate rendering component in your scene. Ensure that the skybox is set to render as a backdrop to the rest of the scene.
5. Testing and Optimization:
Once you’ve implemented the custom skybox, it’s crucial to thoroughly test it on the Quest device to ensure it performs well and doesn’t hinder the overall experience. Optimize the skybox’s performance by adjusting parameters such as texture resolution, compression settings, and shader complexity.
Conclusion:
Creating a custom skybox for the Quest allows you to personalize your VR experience and transport yourself to extraordinary worlds. By following this comprehensive guide, you now have the knowledge and tools to design and implement stunning skyboxes in your Quest applications. Get ready to elevate your virtual reality adventures and captivate your audience with immersive custom skyboxes.

You May Also Like:
Boost Your Productivity with Meta Quest 3: A Comprehensive Guide
How to Use Skybox VR on Oculus Quest 2&3- Your Gateway to Virtual Reality Adventures
How to Get Steam VR Home: A Quick Guide